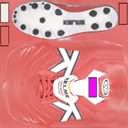
The only empty area of your boot is the place I usually put my Jamaican flag. this doesn't show up in-game, kids - so don't make your boots and put my flag there. Get your own! You could put whatever you like, or nothing at all there... then resize it to 128x128 and Hey! Presto! You've just completed your first boot. (Using my tutorial, anyway).
Just flatten the image and save as whatever the boot name is. I hope that as a result of my finally doing a template and tutorial, I will see many boot threads springing up - I do not want this tutorial reproduced anywhere in any shape or form, otherwise, knock yourselves out, kids.


")

")


")