Dmitri
Reserves
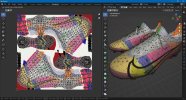
In this post I will show how to use custom boot models.
In default game, there's only one boot model which is a part of body model:
You need to extract each file from zdataX.big archives. Put them in some folder and convert to .gltf with otools (use -dummyTexture option so you won't lose textures information).

Import m200__.gltf to Blender.

Disable everything except sortgroup1 object. Select it and switch to Edit mode.
Toggle X-Ray and select boots part.

Separate the selected part: RMB > Separate > Selection.
Disable X-Ray. Switch to Object mode.
Now you have boots model in a separate object.

We need to save this object to a new file. And we also need to re-save m200__ without this object.
Unhide all objects in the scene.
Apply all transforms: A > Ctrl+A > All Transforms.
Now select boots object and Skeleton object.

Export to m20__0.gltf (Separate, only Selected Objects)

Then delete boots object and re-export body model.

Then for each other body model (m232__.gltf, m242__.gltf, m243__.gltf, m335__.gltf), import it to Blender (start new scene before each import: File > New > General), separate and delete boots part, Apply Transforms, and re-export.
Boots model is exported only once (from m200__ model).
Import .gltf to .o with otools (we need -instances 25 option for body models)

For the new m20__0 model we don't need this parameter, so import it again separately

Now copy m20__0 for each boot ID which is used in the game.
A simple batch script:
Now import these files to the game (with Asset Loader - copy to data/assets folder).
In default game, there's only one boot model which is a part of body model:
Code:
m200__.o - body model detail level 1
m232__.o - body model detail level 2
m242__.o - body model detail level 3
m243__.o - body model detail level 4
m335__.o - body model for Player Edit ModeImport m200__.gltf to Blender.
Disable everything except sortgroup1 object. Select it and switch to Edit mode.
Toggle X-Ray and select boots part.
Separate the selected part: RMB > Separate > Selection.
Disable X-Ray. Switch to Object mode.
Now you have boots model in a separate object.
We need to save this object to a new file. And we also need to re-save m200__ without this object.
Unhide all objects in the scene.
Apply all transforms: A > Ctrl+A > All Transforms.
Now select boots object and Skeleton object.
Export to m20__0.gltf (Separate, only Selected Objects)
Then delete boots object and re-export body model.
Then for each other body model (m232__.gltf, m242__.gltf, m243__.gltf, m335__.gltf), import it to Blender (start new scene before each import: File > New > General), separate and delete boots part, Apply Transforms, and re-export.
Boots model is exported only once (from m200__ model).
Import .gltf to .o with otools (we need -instances 25 option for body models)
For the new m20__0 model we don't need this parameter, so import it again separately
Now copy m20__0 for each boot ID which is used in the game.
A simple batch script:
Code:
copy m20__0.o m20__-1.o
copy m20__0.o m20__-2.o
copy m20__0.o m20__-3.o
copy m20__0.o m20__-4.o
copy m20__0.o m20__-5.o
copy m20__0.o m20__-6.o
copy m20__0.o m20__-7.o
copy m20__0.o m20__-8.o
copy m20__0.o m20__-9.o
copy m20__0.o m20__-10.o
copy m20__0.o m20__-11.o
copy m20__0.o m20__-12.o
copy m20__0.o m20__-13.o
copy m20__0.o m20__-14.o
copy m20__0.o m20__-15.o
copy m20__0.o m20__-16.o
copy m20__0.o m20__-17.o
copy m20__0.o m20__175.o
copy m20__0.o m20__176.o
copy m20__0.o m20__177.o
copy m20__0.o m20__178.o
copy m20__0.o m20__179.o
copy m20__0.o m20__184.o
copy m20__0.o m20__185.o
copy m20__0.o m20__186.o
copy m20__0.o m20__187.o
copy m20__0.o m20__188.o
copy m20__0.o m20__189.o
copy m20__0.o m20__190.o
copy m20__0.o m20__191.o
copy m20__0.o m20__192.o
copy m20__0.o m20__193.o
copy m20__0.o m20__194.o
copy m20__0.o m20__195.o
copy m20__0.o m20__196.o
copy m20__0.o m20__197.o
copy m20__0.o m20__198.o
copy m20__0.o m20__199.o
copy m20__0.o m20__200.o
copy m20__0.o m20__201.o
copy m20__0.o m20__202.o
copy m20__0.o m20__203.o
copy m20__0.o m20__204.o
copy m20__0.o m20__205.o
copy m20__0.o m20__207.o
copy m20__0.o m20__208.o
copy m20__0.o m20__209.o
copy m20__0.o m20__210.o
copy m20__0.o m20__211.o
copy m20__0.o m20__212.o
copy m20__0.o m20__213.o
copy m20__0.o m20__214.o
copy m20__0.o m20__215.o
copy m20__0.o m20__216.o
copy m20__0.o m20__217.o
Last edited:

